Wednesday, August 14, 2013

"Use What You Have Challenge"

Hi there,

     You'd think by now I would be comfortable writing  this blog, but I'm still working out of my comfort zone. It is getting a bit easier, but I'm still learning and it still takes hours (or at least it feels like that) to compose each blog.

     So, for  today's blog I decided to try something else out of my comfort zone & take the Sweet Stamp Shop's "Use What You Have Challenge".    I pulled out some papers I 've had for over a year and other supplies as you an see in the picture.   After pulling out the supplies, I grabbed my folder of pictures and found this adorable picture of my nieces having their first ice cream soda. 

     From these supplies, I created my layout. I have to admit it took a bit of time with fussy cutting and numerous arrangements of the layout, before I came up with this fun layout.


First, I misted my Kraft paper with  Vanilla Mist and let it dry.  I then fussy cut the soda glasses from my paper, and using scraps from the same  paper I used to mat the photo, I cut several strips of paper, rounded the ends, used my white gel pen and added dimension at the top and stripes to make them look like straws and added them to the layout.  To achieve the foaming  soda effect, I then added some faded stamped clouds over the top of the picture and straws and added Snow Flower Soft to the clouds to give them a soda effect.  I used the Snow on the Soda Glasses to make them look full, foaming and running over.  I then added the Journaling beneath the picture about their very first Ice Cream Soda. 

This was a fun challenge and a great way to use up old papers that I wasn't sure how to use.  So, now I  think I'll go one step further and actually enter the layout in Sweet Stamp Shop's "Use What You have Challenge".

Of course, now I have to figure out how to link to their blog and back to this one.  So.............
I'll let you know next time if I "did it right" and got my entry in on time.

Happy Crafting till next time!


Aunt Dee

Products used:  Nikki Silvis You are my favorite collection, Colorbox Vanilla Misting, Core Kraft Paper, White Gel Pen, Flower Soft "Snow" and adhesive, unknown scrap paper for matting, Reflection letter stickers, Lawn Fawn Blue Skies Cloud Stamp, Xyron Mega Runner


Saturday, August 3, 2013

Trying Something New!

       This is my favorite layout so far this year. I received this wonderful picture of my great niece imitating a fisherman on the beach last year. It took me the longest time to scrap this picture as none of the paper worked well with the picture and after several different attempts, I actually tore apart my first layout. It just didn't work and I really disliked how it looked. So the picture (matted on brown) just sat in my pile of pictures to be scrapped.
 
     Then, earlier this year, I had the opportunity to meet Cathy Allen (from Canadian Scrapbooker Magazine) at the Great Canadian Scrapbook Festival in Abbotsford, BC and watch her demo stamping techniques. She also showed us how to create background papers from a plain sheet of white paper with inks and stamps. So I decided to try her technique.
 
      I took a piece of heavy weight plain white 12 X 12 paper. Then taking my blending tool and tips and two colors of distress inks in blue, I started coloring on the paper. I worked a small section of the paper at a time with the light blue (stormy skies). I didn't try to be perfect and left lighter areas on the paper on purpose. After covering the paper with the light blue, I then switched tips and blended in the dark blue (faded jeans) over my previous work. Again, I worked from the corner in towards the center. Knowing that I was going to cover the center of the paper with a picture, I wasn't too worried about covering the very center. 
 
     After I finished all the color work, I dug out my stamps from Sweet Stamp Shop. Using  Tim Holtz's Distressed Faded  Jeans  and Vintage Photo Distressed Ink, I stamped starfish and sand dollars in random patterns all over the paper.
 
      Recycling the netting from a bag of Baby Bell Cheese, I placed it under the matted photo for added texture.    Then I added a sentiment to the picture from a Quick Quotes Rub-on that also included the flip flops and small brown flowers. 
 
     To add more dimension to the layout, I fussy-cut several starfish and sand dollars stamped on water-color paper with Vintage Photo Distressed Ink and layered them using pop-up squares in the upper left corner of the paper and around the lower right corner of the photo. 
 
      All in all, the layout came together so easy using this technique. I can't wait to try it on cards.

Well, that's all for now.   Happy Crafting till next time!
 
Aunt Dee
 
PRODUCTS USED: 12 x 12 plain white heavy stock paper (unknown source), Tim Holtz Distress inks - Vintage Photo, Stormy Skies and Faded Jeans, Sweet Stamp Shop Dream Ocean Stamp Set, Quick Quotes Rub-Ons,  Clear Snap's Stylus and white foam tips and Core'dinations Chocolate Lover Stack., "Canadian Scrapbooker Basics Volume 6: More Stamping   for more details on Cathie Allen's techniques.


Tuesday, July 30, 2013

30 Minutes or Less Cards!

     Don't you just love receiving handmade cards. They can be so much fun to make or receive. I discovered that I enjoy making cards for special occasions for family and friends. Especially for the nieces and nephews. 

     Earlier this year, I attended Scrapbook & Cards Today's Crop & Create in Burnaby, BC.
While there, a group of us were discussing how to store scraps and what did we do with our scraps and a card maker told us after she's done making cards, she takes an additional few minutes and makes card bases from those scraps and stores them. Then when she needs to make a quick card, she just pulls out that base, adds embellishments and sentiments and viola! You have a card in just minutes.
 
     I thought this was a great idea, so in June while making cards for upcoming birthdays, I took all my left over scraps (including those from scrapbooking) and made a couple dozen card fronts. (I kinda got carried away trying out different colors and designs.)


So this month, I realized the day before my sister-in-law's birthday, that I hadn't made and mailed her birthday card, so I quickly went through the card fronts in the box and grabbed a very simple base front of blue & white with a simple pattern and attached it to a David Tutera 4.25 X 5.5 card base.

      I added a blue flower with green rhinestone leaves to the front, leaving enough room to add a Happy Birthday sentiment inked with Tahiti blue Powder Chalk Ink along the sides. (I trimmed the quote to fit the location) .
 
 
For the inside of the card, I inked another sentiment with the same color and attached it with brads, placed a back on the card due to the brads poking through and completed a birthday card in about 15 minutes. As you can see, it came out quite well. 

    So have a fun summer till we Craft Again!
 
     Hmmmm.... guess it is getting a little bit easier to write this blog.  
 
Aunt Dee


Products used: David Tutera 4.25 X 5.5 cards, Quick Quotes Vellum Sentiments, Quick Quotes Tahiti Blue Powder Chalk Ink, Reflections Green Rhinestone crystals, Doodlebug brads.

Sunday, July 14, 2013

LUCKY DAY!

     Scrapbookers are always looking to scrap major events in their lives and nothing could be bigger than being just plain “lucky”. This layout was my “Lucky Day”.  

     I happen to live in the beautiful Pacific Northwest in the wonderful Skagit Valley. Home to the 2nd largest salmon river in Washington State as well as fertile, productive farmland, mountains, hiking trails, parks and communities that pull together.

     On May 23rd, our beautiful Skagit River made international news when the I5 Skagit River Bridge collapsed shortly after 7 pm. What could have been an awful tragedy, turned out to be a very lucky day. Only 3 people and 2 vehicles ended up in the river atop the bridge that carries over 71,000 commuters daily between the Canadian Border and Seattle. No serious injuries and NO LOSS OF LIFE! Now that's lucky. 

     Even luckier for me as I crossed the bridge about 10 minutes earlier than usual on my way home due to getting off work a few minute earlier than normal and I wasn't the only one.  My brother and his wife decided to go home a different way, a friend's daughter-in-law crossed just minutes before it collapsed and there are many other stories of why the bridge was almost empty at that time of night. In other words, it was a very lucky day.
 
  
 To create this layout, I drew a small sketch of the collapse of the bridge. Then I added the characteristics of a bridge such as the bolts, rust, twisted and bent metals. Then I recreated it on a piece of 12 X 12 paper and traced it on my background paper. I cut and distressed each strip, then added adhesive, twisted and folded the strip and attached to my drawn design.


       Then with a black marker I added the bolts and with a q-tip added copper accents  to create the rusty parts of the bridge from copper mist bottle.  Matted my picture on black and added it the center of the “collapsed” bridge.  

     Across the bottom, I  cut a film strip die using a QuiKutz die and added it to the bottom with journaling and pictures of the bridge. I also edged the layout with 1/4” strips of black to complete the polaroid effect.

      The title was created with American Craft Thickers  sprayed with Copper Mist until the color was dark enough and added to the layout.
 
     Page 2 of this layout was again designed to look like a polaroid with the edges and the film strip across the bottom with pictures of the bridge through reconstruction. (The last picture is from the DOT web  showing the bridge's progress). The before picture is  taken on the east side of the bridge,  the collapsed picture is taken the day after it collapsed from the west side and the after picture is taken from the NW side of the temporary bridge two days after it re-opened. The bridge was re-opened on June 19, 2013, just 26 days after it collapsed.
 
     The permanent bridge is being built right beside the temporary bridge and will be rolled into place and operational by October 1 according to the WA State Department of Transportation and before it's in place, we'll spend another month without the bridge and lots of traffic until the permanent one is installed.
 
    Happy Crafting till next time!
 
                                                                                           Crafty Aunt Dee

Products used:  Core'dinations, American Craft thickers, Reflections lettering stickers, Quickutz Die, Americian Craft light grey paper, Illuminaire Copper Mist, Quick Quotes Midnight Magic Chalk Ink and Xyron adhesive.

Saturday, June 22, 2013

Challenging Myself

     For the past few months, I’ve tried really hard to get back into the crafting spirit. I’ve tried everything I could think of and nothing has been working. So I signed up for a  calligraphy workshop to practice Italics, hoping that would help. It did - a little bit, but still not enough to work on layouts or cards.  So then I cleaned my craft room, or rather put everything back where it belongs in the hopes of being able to craft with a clean desk.   That got me to finish some thank you cards. But working on layouts still wasn’t happening.

    So, I decided it was time to challenge myself by completing the first challenge I found  on a blog.  The first blog I looked at was Scrapbook and Cards Today which is my favorite magazine.  They had just posted their May Color Suite Challenge  with colors of white, tan, mint green, orange and  a mauvy pink which are not in my usual comfort zone so, grabbing inspiration from a scrapbook sketch on Pinterest by Ronda Palazzari from My Mind’s Eye , I took the challenge and created this fun picture of my great-niece taken just before surgery to have tubes put in her ear.
 
    Pulling some paper scraps from a grab box I picked up at Quick Quotes last fall,  I was able to create this layout of small squares of pale blue, pink, light tan, and a print with all the colors including a soft orange cut to different sizes and placed randomly on the page. I matted the picture  with the navy blue I used as a base for the layout and journaled along the edges in white.  This was a fun layout to do and she is so cute.

     Now that this layout is done, I’m starting to find my mojo again and get back into crafting.  I can’t wait to try something else to share with you next time.  
 
    Oh my goodness - guess now I’ll have to write a 3rd blog, as I just committed myself to sharing my next layout.  Maybe I’m finally getting comfortable with writing........................ nope, not there yet. It’s still terrifying.

    Until we craft again............

                                                                                                    Aunt Dee
 
Products Used: Quick Quotes Powderpuff Chalk Inks; Quick Quotes papers; Alpha Stickers by Recollections;  Xyron Mega Runner

Saturday, June 15, 2013

Finally, it begins!

Welcome to my blog, or maybe I should be saying "thanks for sharing my birthday present with me". Yep, this blog was designed for me by a niece & nephew as an outlet for all my crafting fun - so this was my birthday present from them. "A Blog" - do you know how terrifying that is to someone who hasn't written anything but reports for the past 35 years along with an annual Christmas letter. Reports are easy - the Christmas letter takes me 4 weeks to write.

For the last 6 months, I've attempted to write this blog and not been happy, so I had my niece read what I had written and she said "You're not writing a report, Aunt Dee, write like  you talk - tell a story". I haven't had the heart to tell her that everyone tells me "I talk TOO much".

Anyway, I'm a Jill of all crafts. I'm a seamstress and have sewn for close to 50 years, I crotchet (hate knitting), embroidery, crossstitch, needlepoint, make ceramics, create jewelry, bookbinding, calligraphy and papercrafting. In otherwords, I've dabbled in it all.

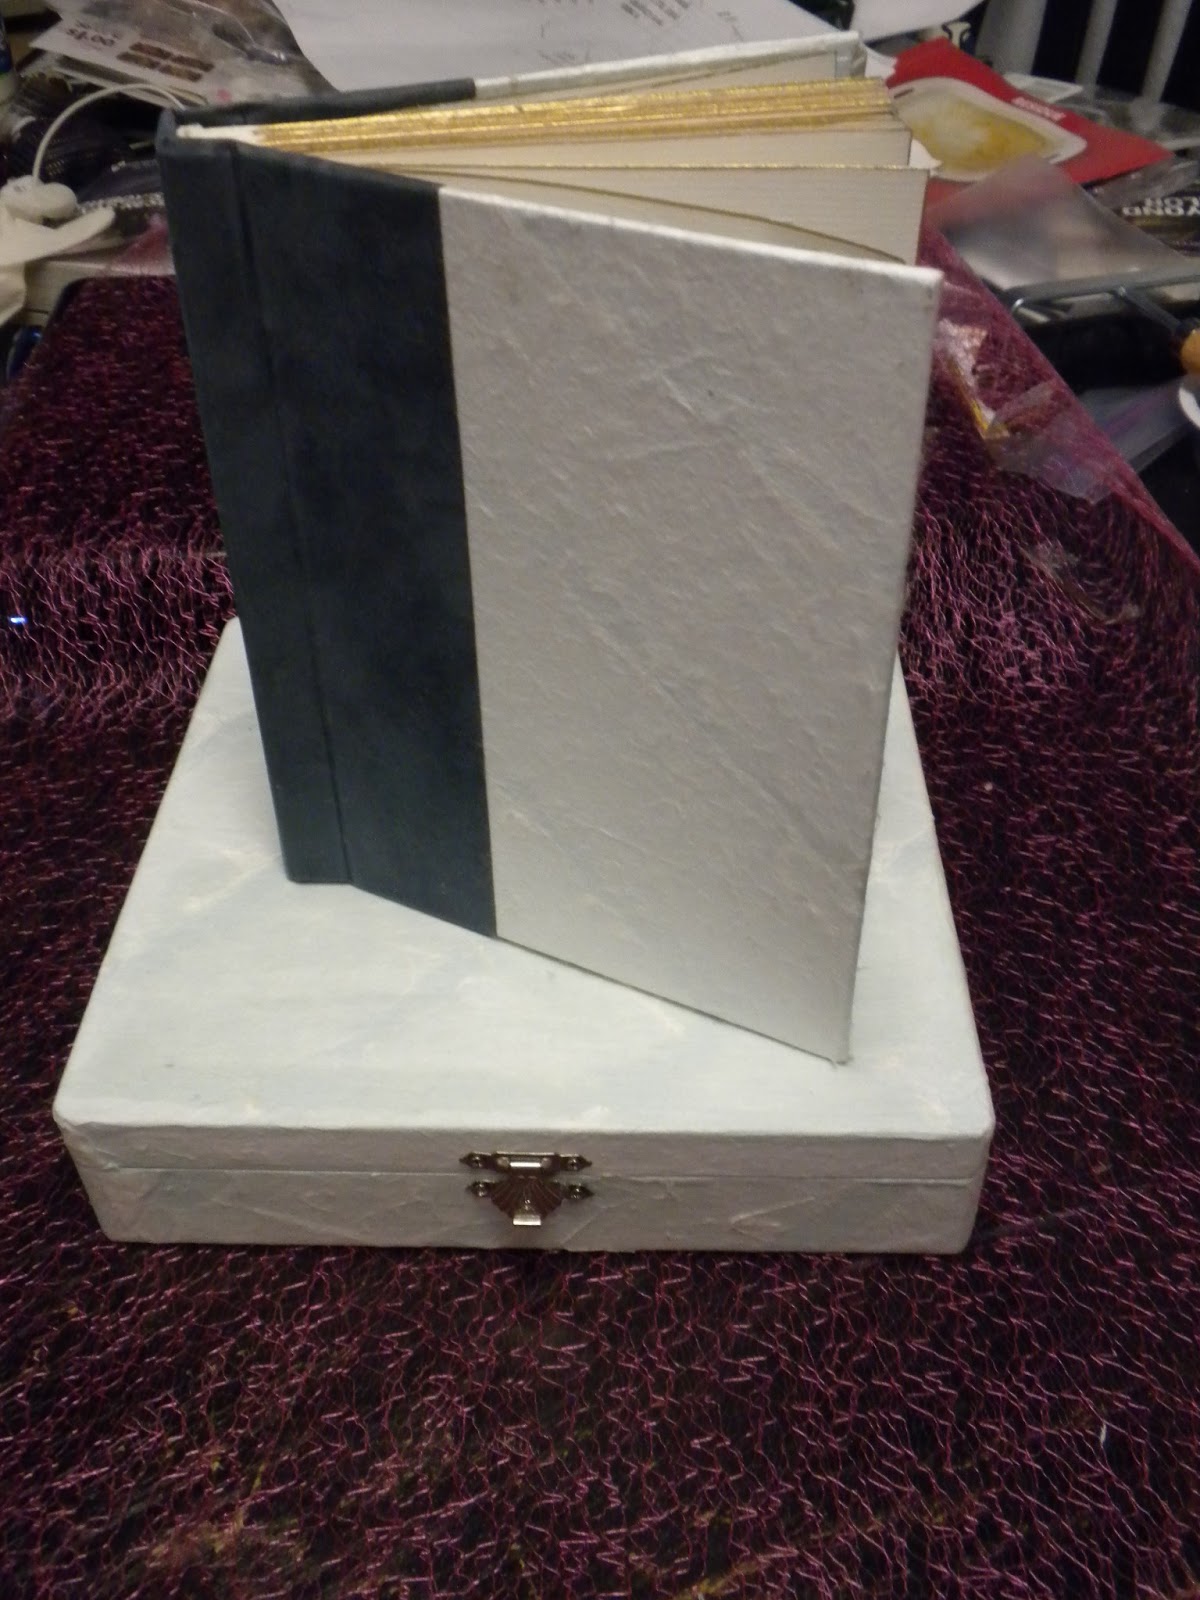
My latest project has been so much fun and that's what I'm sharing today. My sister-in-law, asked me to create a special dedication (christening) book for her daugher's baby gift that can be passed on through the generations along with the dedication outfits she created from her wedding gown.

Using book board, rice paper, and watercolor paper, I created an 80 page hard-bound 5 X 7 book with gilded pages. Included in the front of the book is a Bible Verse, written in Uncial Calligraphy (Matthew 19:14) and my sister-in-law's wedding picture.


The outside of the book is a double layer of blue watercolor paper, overlapped with white rice paper. The spine binding is a blue suede paper. Inside, the same blue water color paper covers the front and back of the book. The inside book blank is made from Arches watercolor paper (off white) It was cut to 5 1/2 X 7, scored at the 1/2 mark for a fold line leaving a 5X7 page. I gilded the edges of each page and added a spacer onto the 1/2 space which allows pictures to be added to the book without increasing the thickness of the book on the open side. The pages were then stacked, pressed and glued and inserted into a cover, creating the book blank and then inserted inside the hardback cover and glued to the spine. ( Note: I layed pictures on every page so that the book was one thickness and placed in the press to allow the book blank to adhere to the binding.) The inside covers were glued in place and the book was completed.

Matching the book was a small wooden box, lined with acid free paper for the book to be housed. I covered the painted box with the rest of the rice paper using modge podge and then sprayed it with a matte sealer.


You can find bookbinding tutorials on line or at your local craft store. Take a chance and step out of your comfort zone and try something new.  Who knows, you might find you like it.
 
Until we craft again!
 
Aunt Dee